Wednesday 29 August 2012

....and now onto the rear end.....

Just as you thought it was all over - here comes the start of the rear end repairs (for the RH side, as the LH side was done last year (just about 12 months ago actually....)

Top or RHR Wheel Arch (Still deciding if i should spend some ££'s and just buy a new one_

RHR of sill, just in front of wheel arch

Bottom of "C" Pillar, looking up from inside wheel arch
 
 Rear of wheel arch, looking in towards the 1/4 panel
 
 Front end of sill (only a small repair required - but still needs doing)
 
 Inner edge of rear body crossmember (That's the fuel tank on the RH side)

Rear body crossmember again

Bottom of "D" Pillar (at the back, the one the rear door hangs on)

Inner rear wheel arch, by fuel filler neck


So, out with my trusty angle grinder and the 1" discs again.......


However, I have now decided on a slightly different course of action, and started to remove the outer rear 1/4 panel last night - not a major PITA job, but still took some time (it's still not off completely) due to the amount of sticky black goo that Land Rover used to stick it down with....
 
More to follow shortly - hopefully not as much time to wait for the next one....
 
But before i disappear from this installment, just a quick one to say that the air bag light stayed off after I powered up the ignition to test the electrics - all i did was unplug the yellow cable from the fusebox, and remove the corresponding 10A fuse, before turning the ignition. Secondly, the ABS lamp now stays off - I eventually changed the ABS ECU for a known good one, which appears to have solved the problem.....

Well, it's been quite busy since my last post - but mainly with non Discovery related stuff.....However, I have managed to get on, and now the front end is finished and 90% re-assembled - Happy Days.....


On top of that, the dash is mostly re-fitted now (apart from the last few bits like the centre console)


Wednesday 20 June 2012

RH side is now done (apart from a niggly water leak somewhere)


inner wing is tidied up too, with all the wiring and auxilliary circuits neatly installed.

And so, onto the LH side......

Passenger floor after carpet and soudproofing sponge removed

Base of Passenger A Pillar

 N/S Battery Tray/Jack Storage

N/S Splash panel (yes that is the wiring loom you can see)

Underneath N/S Battery Tray

A Pillar from outside, after rusty stuff removed (note to self : clean brake calipers afterwards)

Repair sections welded in....


....and a healthy dose of Red Oxide on completed sections/bits that don't need welding.....

......followed by seam sealer

It's been a busy time (when the weather has been right) but all the rot cut away from the N/S now, and the A pillar repaired, along with a couple of plates in the floor. Next job is to fabricate a new inner wing section from my stock plate. Hopefully it will be done in one section, and folded nicely so that it looks better than several smaller section welded together.

Then it's onto curing the few small electrical niggles behind the dash (heater wiring) with sections from my spare Disco, and then the dash can go back in.

After that, it'll be time to clean and treat the RH sill for rust - thankfully it doesn't need welding - and then onto the rear body crossmember, which has some nice crusty bits (and holes) on it.

Hopefully by mid July (weather and time permitting) i'll have access to the lifting equipment i need to remove the body off my spare one, so that i can get the chassis stripped, cleaned and painted, ready to drop the engine, box, axles and body off this one onto it.

To do list includes:

Finish welding/rust treatment (LH Inner wing, RH sill, RH wheel arch, Rear crossmember)
Refit dash (along with a few auxilliary circuits for work lamps etc)
Remove headlining to reseal sunroof's (and run wiring to rear for reverse camera/work lights)
Clean and refurb axles
Rebuild rear brakes with new calipers/bearings/discs/pads

Once body is off:

Timing belt (unknown history on belt, so better to be safe than sorry)
Clean and paint engine block/ancilliaries
Swap cylinder head & turbo for new ones off spare Disco
Remove axles/suspension to swap onto replacement chassis
Remove engine/box to swap onto replacement chassis
Clean and refurb bumpers
Fully inspect body for any inaccessible areas and treat for rust
Lots of underseal/waxoyl onto body underside

So, quite a lot to do - ideally by late September/Early October - ready for winter.

Fingers crossed for a nice dry summer too, as it's all happening outside


Wednesday 23 May 2012

More fun and games now that we have got some nice warm weather, and I can get out to play in the evenings after work.
So, out with the grinder and wire brush.....

Drivers floor coated with rust killer liquid first, then Hammerite Rust Eater primer. This will also get a coat of red oxide on top


Template made from cardboard to fill in the hole, then transferred to metalwork and welded into place. Rust killer, red oxide, seam sealer then underseal and wax to come


Thursday 17 May 2012

Improving access to the rusty stuff....

In order to properly assess and attack the rust in the A pillars, I've had to remove the dash (which is a nice job, plenty to unplug and unscrew)

This allowed me to fully inspect the n/s A pillar, and also spot where the water leak is on that side too, although i suspect the heater needs resealing to the scuttle panel too.

Bottom of A Pillar on N/S

Bottom corner of windscreen on N/S

Top of A Pillar on N/S - only surface rust, but i'm sure it will get worse when i get the N/S wing off

Wednesday 9 May 2012

May 2012 - Rusty stuff cont.....

So out with the angle grinder and 1mm discs......
to get rid of the inner wing rot (and under the battery tray)

there's still a few seams to finish, and then make up a plate to go under the battery tray to close that off. After that a liberal coating of rust killer, followed by red oxide, seam sealer, then lots of cavity wax and underseal to the under arch area, and a coat of paint to the under bonnet area.
May 2012 - "I think i'll start tidying up the front end a bit today" - oh dear......

Well, one of those mad moments came about on a nice Sunday morning. I thought, quite innocently, that i'd start to tidy up the RH headlamp box, rust treat the surface, and paint it up to stop it getting worse......


Looks good, but as you can see, the wing is off too...........here's why......


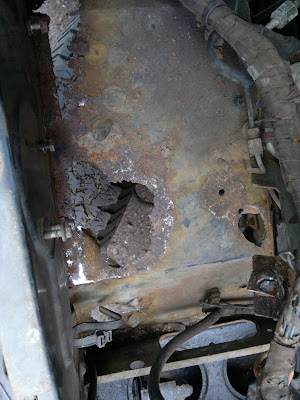
lot's of rusty stuff to play with. You can see from the top picture where the water has been running through the drain hole in the side of the scuttle panel, down the A panel along the wing stiffeneer, and then gathering at the bottom causing corrosion. I can only really put this down to the poor seam sealer, as it crumbled and lifted off when i started to prod.